

Elliott Wave Contracting Triangle Explained
The Most Common Triangle Pattern (~80% of All Triangles)
The Elliott Wave contracting triangle is the textbook version of the pattern, the one most traders picture when they hear “triangle.” It’s also the most frequent, the large majority of triangle formations you will encounter across every market and timeframe.
Contracting Triangle Structure at a Glance
- Position: Wave 4, Wave B, Wave X, or the final leg of a combination, the same positional rule that governs every triangle type
- Subdivisions: 5 waves (A-B-C-D-E), each a 3-wave structure (3-3-3-3-3)
- Shape: Both trendlines converge symmetrically toward an apex
- Rule: Each wave contracts against the last one travelling in the same direction, so C is shorter than A, E is shorter than C, and D is shorter than B
- Thrust: Equal to the widest part of the pattern, the height of Wave A
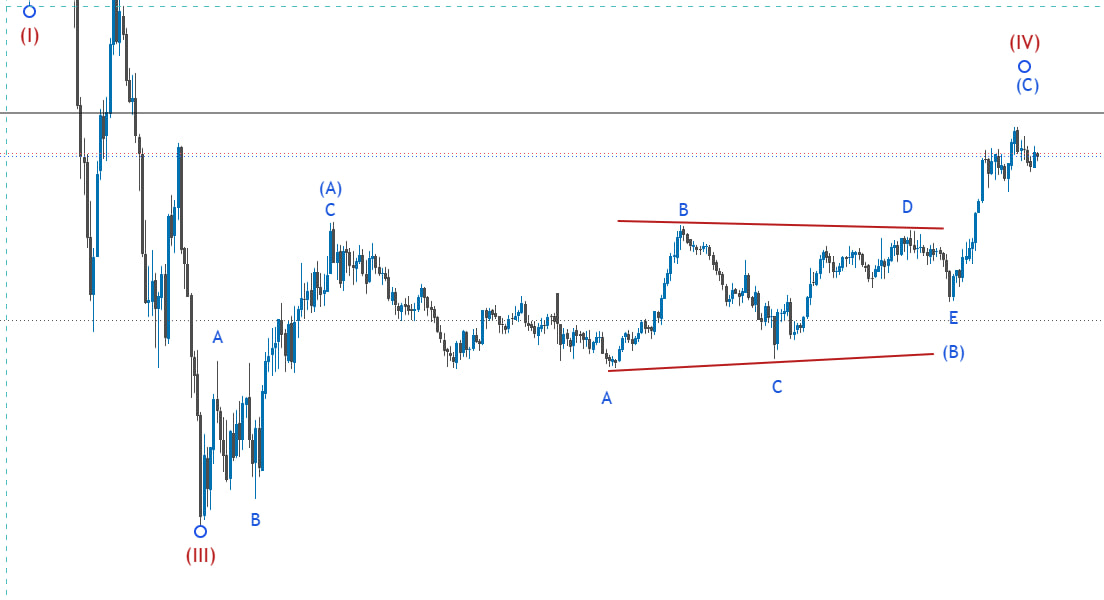
See a live example of this structure below.
Why the Progressive Shrinking Matters
A contracting triangle is defined by steadily decreasing amplitude. Wave B doesn’t travel as far as wave A did, wave C falls short of wave B, wave D falls short of wave C, and wave E, the final leg, is the smallest swing of all. That steady contraction pulls both trendlines toward a single point, the apex, and makes the pattern easy to spot once you know to look for it, each swing visibly tightens compared to the last.
A Real Chart Example: Wave (B) Contracting Triangle
The chart below shows a genuine contracting triangle unfolding in the wave (B) position, forming after the wave (III) decline and resolving into wave (IV). Inside wave (B), the five legs, A, B, C, D, and E, each subdivide into three-wave structures, exactly as the rule requires.
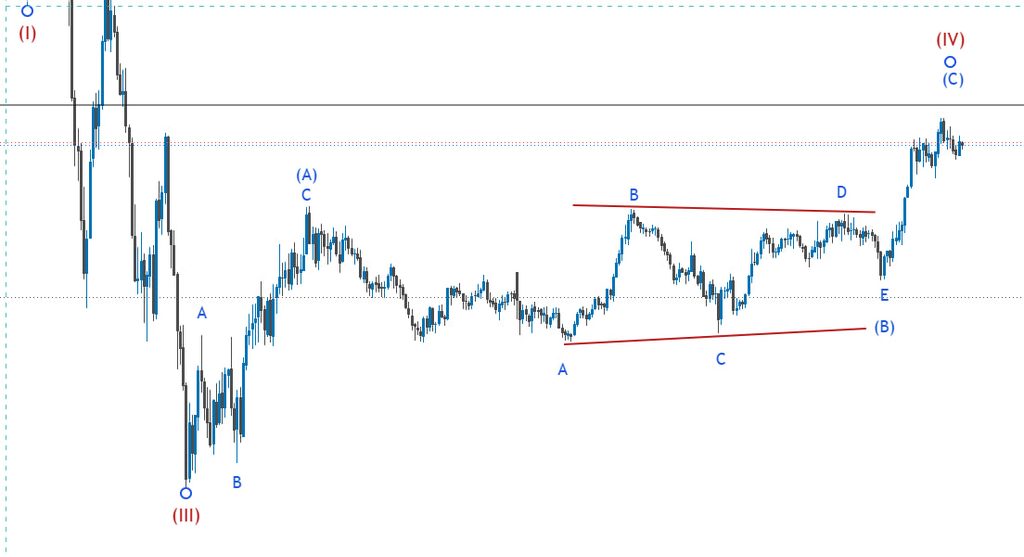
Both trendlines converge as the pattern develops: the upper line connects the highs of B and D, while the lower line connects the lows of A and C, with wave E finally touching that lower trendline before the pattern completes. Each leg is visibly smaller than the one before it, wave B doesn’t reach as high as the move into (A) did, and by the time wave E forms, the price range has contracted to its narrowest point in the whole structure. Once E completes, price breaks decisively higher, exactly the kind of thrust the pattern is known for.
Contracting Triangle Fibonacci Ratios
Beyond the basic shrinking rule, contracting triangles tend to respect specific Fibonacci retracement ranges between waves:
- Wave B typically retraces 61.8% to 78.6% of wave A
- Wave C typically retraces 61.8% to 78.6% of wave B
- Wave D typically retraces 61.8% to 78.6% of wave C
- Wave E typically retraces 61.8% to 78.6% of wave D, and often overshoots or falls short of the trendline before finally reversing
These ratios aren’t strict requirements, but seeing them line up adds confidence that the sideways move is a genuine triangle rather than a random consolidation.
The Payoff: Trading the Thrust
Once wave E completes near the apex, price doesn’t usually resume the prior trend gradually, it thrusts. That’s the defining behavior traders wait for, a swift, often sharp move in the direction of the larger trend, with a minimum target equal to the width of wave A projected from wave E’s completion.
How to Trade a Contracting Triangle
Two standard approaches apply:
- Trade the thrust after Wave E: enter on a decisive break of wave D’s extreme once wave E completes, targeting 100% of wave A’s height, with a stop just beyond wave E’s high or low
- Fade Wave E at the trendline: enter as wave E touches the A-C trendline, anticipating the move back toward the B-D line before the real thrust begins
Contracting Triangle vs. Expanding Triangle
It’s worth noting the contracting triangle’s defining feature, each wave shrinking relative to the last, is the opposite of its far rarer cousin, the expanding triangle, where each wave grows larger than the one before it. If a triangle appears to be widening rather than narrowing as it develops, it likely isn’t a contracting triangle at all, and the shrinking-wave rule outlined above won’t apply.
Common Mistakes to Avoid
- Labeling a triangle in Wave 2 or Wave A, triangles only occur in Wave 4, B, X, or as the closing leg of a combination
- Treating any 5-wave sub-swing as part of the triangle, all five legs must be 3-wave structures
- Waiting for wave E to touch the trendline before acting, it often falls short and reverses early
- Setting a thrust target that’s too conservative, use the full width of wave A as the minimum
- Ignoring the common wave E overshoot, leave a buffer on stops
Contracting Triangle Quick Reference
- Type: Contracting (Standard)
- Frequency: ~80%, the most common triangle type
- Key tell: Each wave is shorter than the last wave going the same way, C shorter than A, E shorter than C, D shorter than B
- Thrust target: 100% of Wave A’s height, projected from Wave E’s completion
- Where it appears: Wave 4, B, X, or the final leg of a combination, never Wave 2 or A
⚠ Educational content for learning Elliott Wave principles only. Not financial advice.
Join the discussion